Change-Id: I9d7d44e98487a230103b532ee55283a49d93229f
Implements: blueprint use-openstack-command
5.5 KiB
Security hardening
OpenStack Compute can be integrated with various third-party technologies to increase security. For more information, see the OpenStack Security Guide.
Trusted compute pools
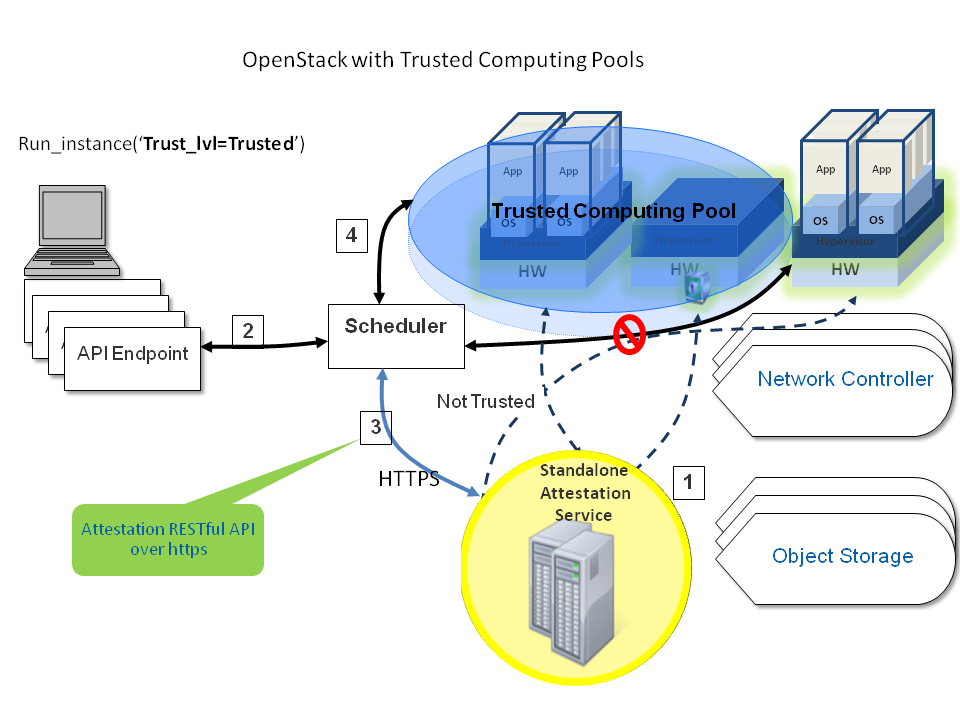
Administrators can designate a group of compute hosts as trusted using trusted compute pools. The trusted hosts use hardware-based security features, such as the Intel Trusted Execution Technology (TXT), to provide an additional level of security. Combined with an external stand-alone, web-based remote attestation server, cloud providers can ensure that the compute node runs only software with verified measurements and can ensure a secure cloud stack.
Trusted compute pools provide the ability for cloud subscribers to request services run only on verified compute nodes.
The remote attestation server performs node verification like this:
- Compute nodes boot with Intel TXT technology enabled.
- The compute node BIOS, hypervisor, and operating system are measured.
- When the attestation server challenges the compute node, the measured data is sent to the attestation server.
- The attestation server verifies the measurements against a known good database to determine node trustworthiness.
A description of how to set up an attestation service is beyond the scope of this document. For an open source project that you can use to implement an attestation service, see the Open Attestation project.

Enable scheduling support for trusted compute pools by adding these lines to the
DEFAULTsection of the/etc/nova/nova.conffile:[DEFAULT] compute_scheduler_driver=nova.scheduler.filter_scheduler.FilterScheduler scheduler_available_filters=nova.scheduler.filters.all_filters scheduler_default_filters=AvailabilityZoneFilter,RamFilter,ComputeFilter,TrustedFilterSpecify the connection information for your attestation service by adding these lines to the
trusted_computingsection of the/etc/nova/nova.conffile:[trusted_computing] attestation_server = 10.1.71.206 attestation_port = 8443 # If using OAT v2.0 after, use this port: # attestation_port = 8181 attestation_server_ca_file = /etc/nova/ssl.10.1.71.206.crt # If using OAT v1.5, use this api_url: attestation_api_url = /AttestationService/resources # If using OAT pre-v1.5, use this api_url: # attestation_api_url = /OpenAttestationWebServices/V1.0 attestation_auth_blob = i-am-openstackIn this example:
- server
-
Host name or IP address of the host that runs the attestation service
- port
-
HTTPS port for the attestation service
- server_ca_file
-
Certificate file used to verify the attestation server's identity
- api_url
-
The attestation service's URL path
- auth_blob
-
An authentication blob, required by the attestation service.
Save the file, and restart the
nova-computeandnova-schedulerservice to pick up the changes.
To customize the trusted compute pools, use these configuration option settings:
| Configuration option = Default value | Description |
|---|---|
| [trusted_computing] | |
| attestation_api_url = /OpenAttestationWebServices/V1.0 | (StrOpt) Attestation web API URL |
| attestation_auth_blob = None | (StrOpt) Attestation authorization blob - must change |
| attestation_auth_timeout = 60 | (IntOpt) Attestation status cache valid period length |
| attestation_insecure_ssl = False | (BoolOpt) Disable SSL cert verification for Attestation service |
| attestation_port = 8443 | (StrOpt) Attestation server port |
| attestation_server = None | (StrOpt) Attestation server HTTP |
| attestation_server_ca_file = None | (StrOpt) Attestation server Cert file for Identity verification |
Specifying trusted flavors
Flavors can be designated as trusted using the
nova flavor-key setcommand. In this example, them1.tinyflavor is being set as trusted:$ nova flavor-key m1.tiny set trust:trusted_host=trustedYou can request that your instance is run on a trusted host by specifying a trusted flavor when booting the instance:
$ openstack server create --flavor m1.tiny \
  --key-name myKeypairName --image myImageID newInstanceName

Encrypt Compute metadata traffic
Enabling SSL encryption
OpenStack supports encrypting Compute metadata traffic with HTTPS.
Enable SSL encryption in the metadata_agent.ini file.
Enable the HTTPS protocol.
nova_metadata_protocol = httpsDetermine whether insecure SSL connections are accepted for Compute metadata server requests. The default value is
False.nova_metadata_insecure = FalseSpecify the path to the client certificate.
nova_client_cert = PATH_TO_CERTSpecify the path to the private key.
nova_client_priv_key = PATH_TO_KEY